How to do some random things in Ren'Py (if you feel like it)
Over the years I've figured out to do some arbitrary kind-of-specific things in the engine Ren'py, but I haven't actually managed to finish a single project in it. Just 1000 years of goofing off...
So that I've not completely wasted my time, I'm trying to compile some short "tutorials" here with things I figured out how to do, so maybe someone else will get use out of them...really I'm not good at explaining things and some things may end up being so short that they may not really count as tutorials...Eh...
So I will just be adding things here as they occur to me and as I figure out how to write them out.
You don't really have to credit me if you use any of this information in something, I'm just getting it out of my system...
Table of contents
Ok, there's only one thing here right now...I'll work on it...
Character Icons in History Screen
This wasn't something I really intentionally set out to put in anything, but while I was looking for how to do something else (I forgot what that was) I found an old Reddit post where someone was asking about this...and the answer they got seemed a little bit really bad. So I ended up getting distracted from what I was doing to make a better way of doing it, just because I was so disturbed by the bad answer.
...It's not like the person who asked that question will ever see this though. The post was like a year old they probably don't care at this point so why would I go through the trouble of posting on Reddit over that. That's why this advice is here and not on Reddit. Well anyway:
The goal of this is to put a little icon next to entries in the History screen, which is different for each character.
The not very good version I saw:
The answer that the questioner ended up accepting was to go into screens.rpy, find the History screen, and add a single line of code right above the code that displays the name label on history entries.
The added line is highlighted in pink here:
window:

              ## This lays things out properly if history_height is None.
              has fixed:
                  yfit True

              add "images/[h.who].png" xalign 0.1 yalign 1.0

              if h.who:

                  label h.who:
                      style "history_name"
                      substitute False

                      ## Take the color of the who text from the Character, if
                      ## set.
                      if "color" in h.who_args:
                          text_color h.who_args["color"]
I really wish to stress that even as a complete doofus about coding who has never finished anything of even slight significance, I am reasonably confident in saying this is a terrible way of doing this.
This is asking for a file with the exact name of the character's name, as in the one that appears over their textbox when they speak, and then adding it to the history screen. This technically accomplishes the goal.
However, every character has to have an image, if a character is labeled with multiple names you'd at best end up with a lot of duplicate files, it has no way of holding up to a translation that might change the exact name of the character, and cannot be used in any game where any character's name can be changed based on player input. (Think of how often games let the player input their own name!! Agh!!)
This is because if there's no filename with the character's exact name the game will error out due to not being able to load the image.
It's a quick and easy-looking solution, but with so many ways it can fall apart in extremely common situations it's just not a good idea...
So now I will try to explain my version that would hopefully break less.
Just making a little picture
This part's a bit obvious sorry...
Of course what you want the picture to look like will depend on the art direction of what you're working on so I cannot really give very specific instructions. Just make sure it's small! Or at least export it at a small size. I went for a resolution of 150x150 pixels, and even that may be a little big for some cases. I'd also advise using the same image size for every one of these icons you make...It won't technically break anything if you vary the sizes, but when you're placing the icons in the UI you would rather not deal with one random character being a completely different size and resolution than all the others and throwing off your code entirely whenever it speaks.
I made this one out of a picture of a potato I found on Google.

When you save/export the image, name it something relatively convenient (you'll have to type it again but only a little bit) and then put it in your project folder. You can technically put it anywhere, but personally I thought it was most convenient to have it in a new subfolder created under "images", which I called "hist"...which is short for history...It's just nice to be organized...
So the file path that Ren'Py will understand for accessing this file is "/images/hist/potato.png".
Turns out you can just put anything in the character arguments actually
Yeah you can just make stuff up!
If you have any familiarity with Ren'Py at all you almost certainly already know how characters are defined:
define p = Character(_("Potato"), color="#c8ffc8")
That color="#c8ffc8" part is an argument. And there are a few standard ones that the engine knows what to do with by default...but you can just make one up to use for yourself if you want, and the engine doesn't seem to mind.
(Arguably you could use the standard "image" argument for this if you were careful about it, but using a standard argument in a kind of unusual way might risk bumping into some things...So I'll make a new argument just to be safe and also to feel more clever about it.)
define p = Character(_("Potato"), color="#c8ffc8", histimg = "potato")
Here the custom argument I've defined is "histimg". You can make this whatever you want (assuming you don't overlap with the standard ones in the documentation...that might cause strange behavior), but make sure it's the same for every character you want the icons for. Make the histimg value for each character match the filename of the icon you want to use for them. (Minus the file extension.)
Making these things actually show up
Now, we can go back to the History screen in screens.rpy, and take a look at this:
window:

              ## This lays things out properly if history_height is None.
              has fixed:
                  yfit True

              if h.who:

                  label h.who:
                      style "history_name"
                      substitute False

                      ## Take the color of the who text from the Character, if
                      ## set.
                      if "color" in h.who_args:
                          text_color h.who_args["color"]
Look at the last part, which changes the color of the name label depending on what the character's defined color is, if a color is defined. We will use basically this same logic for adding the icons!
First we will use if "histimg" in h.who_args: to check if the "histimg" argument exists in the speaking character's arguments, to avoid errors for any characters that may not have that defined.
Then we'll take another look at that add "images/[h.who].png" xalign 0.1 yalign 1.0 line from before. While this exact way of doing it wouldn't really work out well for the reasons I explained before, it does have almost the right idea with the "[h.who]" part. This will substitute the name of the file that Ren'Py looks for with the variable in brackets, which allows for the icon to be different for each character pretty easily. We just want the variable we check for to not be the character's exact name displayed to the player that it's currently checking for, and instead be looking for the "key" we defined under "histimg". And we know how to check the value of a specific argument from the text_color h.who_args["color"] line already!
Replacing the variable checked for and adjusting for my slightly different file organization, we'd get add "images/hist/[h.who_args[histimg]].png" xpos 0.1 yalign 1.0.
...Yes there are quotation marks around "color" in the color argument check but not around "histimg" in this substitution don't worry about it it would just break if I used quotation marks there. It works this way don't worry about it.
And we can just put that above the name label again...
window:

              ## This lays things out properly if history_height is None.
              has fixed:
                  yfit True

              if h.who:


                  if "histimg" in h.who_args:
                      add "images/hist/[h.who_args[histimg]].png" xpos 0.1 yalign 1.0


                  label h.who:
                      style "history_name"
                      substitute False

                      ## Take the color of the who text from the Character, if
                      ## set.
                      if "color" in h.who_args:
                          text_color h.who_args["color"]
And it looks like this!
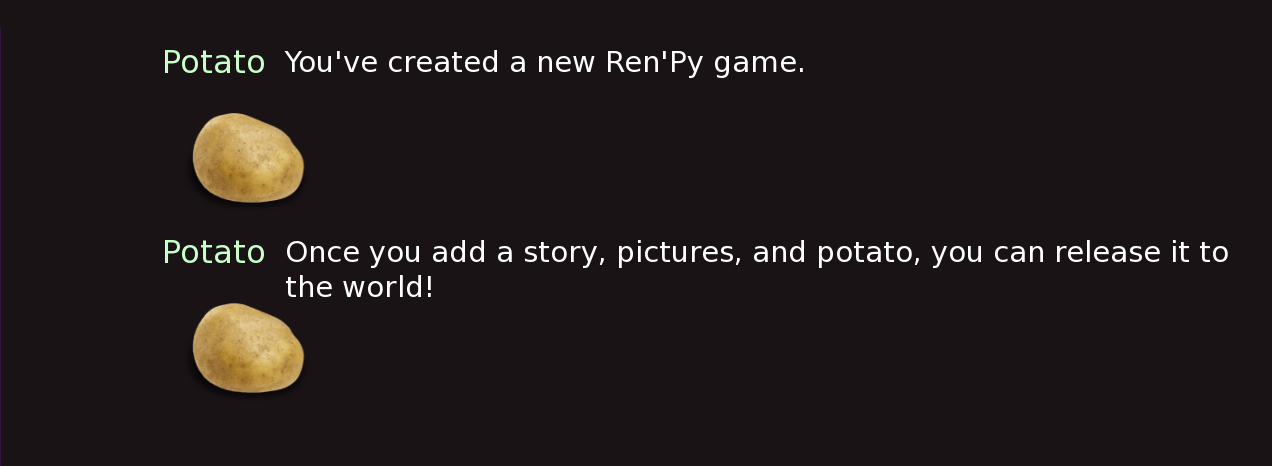
...It's a little badly placed! This can be fixed.
Getting finicky over the exact location of the potato
This last part may be kind of subjective or possibly just irrelevant to you depending on how exactly you have your GUI laid out, but I figure it is better how to more or less have control over where the icon goes rather than just hoping it doesn't overlap with your text...
Luckily, this is so simple that I feel a bit silly explaining it.
First, add a line that just says vbox: right under if h.who:, and make sure it's indented further in than the if h.who line.
You'll want to highlight the whole indented section under vbox:, and press the Tab key on your keyboard to indent that whole section in further than the vbox: line.
It should look something like this, if you can even tell the difference:
      window:

                ## This lays things out properly if history_height is None.
                has fixed:
                    yfit True

                if h.who:


                    vbox:

                    ## This following section has been indented more...

                      if "histimg" in h.who_args:
                          add "images/hist/[h.who_args[histimg]].png" xpos 0.1 yalign 1.0

                      label h.who:
                          style "history_name"
                          substitute False

                          ## Take the color of the who text from the Character, if
                          ## set.
                          if "color" in h.who_args:
                              text_color h.who_args["color"]
Now it should look like this in-game!
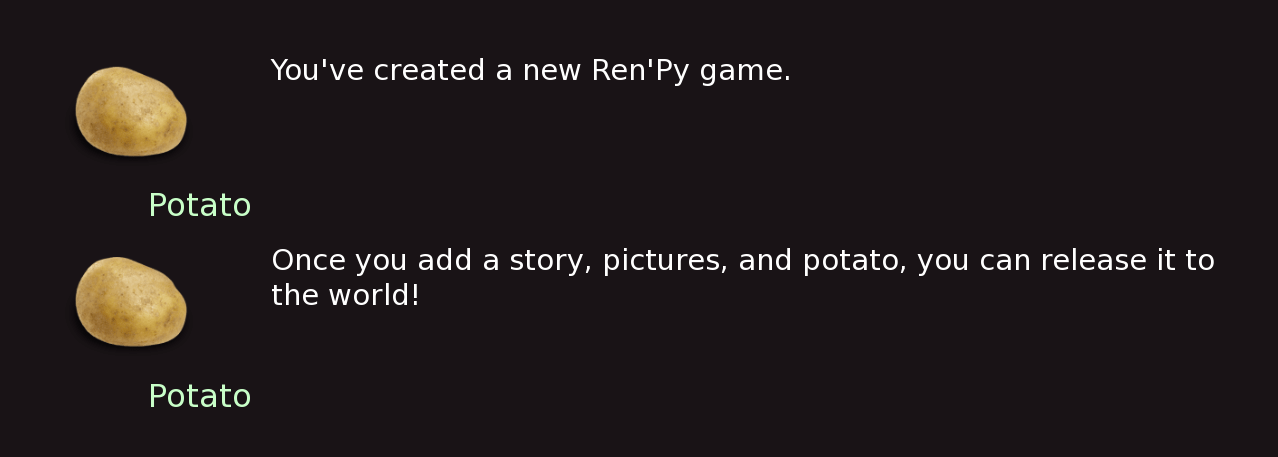
It's better now! You could get more finicky with the exact placement of the image in the line adding it (it does feel a little off center even now, doesn't it...), but that would vary depending on what you want and your image size and is very tedious, so I won't explain it in detail forever...
I will just say that if you wanted to have the name label be above the speaker icon, then you can accomplish that by simply moving the section checking for the histimg argument and adding the image to be underneath the section adding the label, so long as they're kept in the same vbox section.
You could also mess around with using an hbox instead of a vbox, so you could have the icon and label be next to each other horizontally rather than stacked on top of each other, but getting that to fit in the screen well would require a lot more modification of the history screen's layout which would be almost completely off topic at that point...My point is you could do some different things from here.